2014年8月6日 星期三

SSDT Hook

A. SSDT

SSDT 全名為System Service Dispatch Table,從圖來解釋比較快。Windows中Service Descriptor Table有兩種,分別是KeServiceDescriptorTable以及 KeServiceDescriptorTableShadow。每一個Table都是用一個SST Strucute來定義。
而SST中的欄位:
ServiceTableBase: points to the SSDT
ServiceCounterTableBase: Not used
ServiceLimit: number of entries in the SSDT
ArgumentTable: points to the SSDP table (system service Parameter table). 每一個byte儲存每一個SSDT routine其parameter所需用到的bytes數


因此循著ServiceTableBase的address可以找到SSDT的位置。在利用index找到target routine就可以進行hook了!

我們可以用windbg來實際看一下SSDT長什麼樣子
依照前幾篇文章設定好的VS2013+VM target machine的 remote debug
我就透過VS2013直接對我在VM中的windows7進行debug

(1) dd KeServiceDescriptorTable

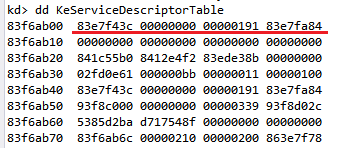
可以看到KeServiceDescriptorTable的內容被印出來啦!根據前面介紹的概念,紅線標出的部分就是Structure的內容,因此83e7f43c就是SSDT 的address。至於其他內容代表的是什麼還有待查證。
用 dps nt!KeServiceDescriptorTable l4 也可以看到內容。

(指令 dd 的第一個d是代表印出指向指定位置的內容,第二個d代表用DWORD的形式,因此也有db(byte),du(unicode),dc(char)等指令)
(指令 dps代表 display words and symbol,l4是line4,印出4行)

(2) dps nt!KiServiceTable L poi nt!KiServiceLimit
此時會依據KiServiceLimit內容印出KiServiceTable,由於KiServiceLimit是此SSDT的number of entris,因此這行指令代表的就是印出KiServieTable的全部內容啦! 
(這裡的KiServiceTable應該就是structue的name,就是SSDT本人啦)
可以看到每一個SSDT routine以及他們的memory address。
(圖中可以看到第一排的第一個addr 83e7f43c,這不就是我們前一步看到的KeServiceDescriptorTable的內容嗎?沒錯,事實證明83e7f43c就是SSDT的起始address啦~太棒啦)

B. SSDT Hooking

Hook說穿了就是把SSDT中的某一個entry內容改掉,變成指向我們的hook function,為了避免system crash最後在hook function中再call 原先的SSDT routine。 

用A(2)的圖來解釋的話,如果我們想要hook NtAcceptConnectPort,就只要把SSDT[0]的內容改成我們自己的hook function address就可以啦(原本是8407afcf),如此一來每當系統要call這個native api並到SSDT中來找時就會循著address找到我們的hook function。hook function就會依照programmer的設計來做事了。

C. Hooking ntQuerySystemInformation

這一次我想hook的native api是 ntQuerySystemInformation,要找到ntQuerySystemInformation要從 ZWQuerySystemInformation開始,ZWQuerySystemInformation是ntoskrnl.exe中的一個win32 API,只要將ZWQuerySystemInformation的code做disassemble就能夠發現ZWQuerySystemInformation其實是將index value存入eax register,在call KiServiceTable,也就是到SSDT中根據Index value找到ntQuerySystemInformation的address。最後就執行ntQuerySystemInformation。

用windbg command可以用 u nt!ZwQuerySystemInformation看到反組譯後的code,由mov到eax的value可以知道ntQuerySystemInformation的index value是261(10進制)。我們就可以用
SSDT 起始address+4*index來算出ntQuerySystemInformation 存在SSDT中的哪一個位址。

D. Code Explaination

(1) Function Prototypes

MyDriver_UnSupportedFunction: assign給driver object的function,告訴driver object要做哪些事。目前沒有太大的用途囉。
MyDriver_Unload: 當Driver要unload時會call此function
DriverEntry:為此程式的entry point

/* Function Prototypes */
NTSTATUS MyDriver_UnSupportedFunction(PDEVICE_OBJECT DeviceObject, PIRP Irp);
VOID MyDriver_Unload(PDRIVER_OBJECT DriverObject);
NTSTATUS DriverEntry(PDRIVER_OBJECT pDriverObject, PUNICODE_STRING pRegistryPath);


(2) Compile directives

#pragma alloc_text(INIT, DriverEntry)
#pragma alloc_text(PAGE, MyDriver_Unload)
#pragma alloc_text(PAGE, MyDriver_UnSupportedFunction)

#pragma是一個預處理指令,告訴compiler要做些特別的事(如果compiler看得懂的話才會做)
而 #pragma alloc_text 只能處理C function,用來指定section locations.Microsoft 文件有提到"The alloc_text pragma must appear after the declarations of any of the specified functions and before the definitions of these functions"因此要注意#pragma的位置。
這裡指定DriverEntry載入到INIT記憶體區段中,最後Unload之後,可以退出memory。另外兩個function則是指定載入PAGE sections。

(3) System Service Table Structure

/*The structure representing the System Service Table*/
    typedef struct SystemServiceTable{
    UINT32* ServiceTable;
    UINT32* CounterTable;
    UINT32* ServiceLimit;
    UINT32* ArgumentTable;
} SST;

/* Declaration of KeServiceDescriptorTable, which is exported by ntoskrnl.exe */
// KeserviceDescriptorTable symbol is just a memory addr exported by kernel
__declspec(dllimport) SST KeServiceDescriptorTable;


KeServiceDescriptorTable可以由ntoskrnl.exe得到,因此為了得到kernel輸出的symbol,必須透過__declspec(dllimport)的方法。dllimport可以用來告訴compiler,kernel要export一個特定的function,叫compiler不要throw error出來。(一般來說compiler會反應error因為compiler不認識這個function)最後如果我們要用到此symbol時,linker會負責找到這個symbol的address。

因為kernel給我們的symbol 只有一個address,而address裡的內容我們必須要定義一個structure來取出我們要的info。因此我們定義了一個SystemServiceTable的結構以取出該address中的資料。

(4)ZwQuerySystemInformation Definition

/* Required information for hooking ZwQuerySystemInformation */
NTSYSAPI NTSTATUS NTAPI ZwQuerySystemInformation(
    ULONG SystemInformationClass,
    PVOID SystemInformation,
    ULONG SystemInformationLength,
    PULONG ReturnLength
);

typedef NTSTATUS(*ZwQuerySystemInformationPrototype)(
    ULONG SystemInformationClass,
    PVOID SystemInformation,
    ULONG SystemInformationLength,
    PULONG ReturnLength
);

/* global variable is used as a placeholder for saving the old address from SSDT */
ZwQuerySystemInformationPrototype oldZwQuerySystemInformation = NULL;


ZwQuerySystemInformation是我們想要hook的function,負責回傳特定的system information。(此function 在win8上好像已經不能使用?)和上面一樣,我們沒有kernel code,因此只好依著查到的prototype來定義一個自己用的ZwQuerySystemInformation。Structure的parameter說明如下:
(a)SYSTEM_INFORMATION_CLASS:定義了我們想要retrieve的system information的type,可以是SystemBasicInformation、SystemProcessInformation、SystemProcessPerformanceInformation...等,詳細的資訊可以去msdn查。
(b)SystemInformation: 是一個指向buffer的pointer。buffer中存的是retrieve回來的資料。至於buffer的大小和struct視SystemInformationClass 而定。
(c)SystemInformationLength: buffer的size(bytes)
(d)ReturnLength: optional 參數,就是實際被寫入buffer中的bytes

另外我們需要定義一個function pointer oldZwQuerySystemInformation,這個function pointer會儲存舊的native api的address,我們在hook function中會需要此function pointer來指到真正的ZwQuerySystemInformation,讓系統繼續完成他的工作。

這裡的oldZwQuerySystemInformation是一個global variable,當作一個容器儲存被我們hook的native function。

(5) Set Write Access to WP flag

/* Disable the WriteProtect bit in CR0 register */
void DisableWP(){
    __asm{
        push edx;
        mov edx, cr0;
        and edx, 0xFFFEFFFF;
        mov cr0, edx;
        pop edx;
    }
}
/* Enable the WriteProtect bit in CR0 register */
void EnableWP(){
    __asm{
        push edx;
        mov edx, cr0;
        or edx, 0x00010000;
        mov cr0, edx;
        pop edx;
    }

我們對SSDT是沒有write access的,那要如何取得權限呢? reference[1]中有提到3個方法,那我一樣是採取最方便的做法,將CR0的WP flag 設成0,一旦設成0就能夠寫入SSDT新的資料,最後結束hooking時再將CR0的WP flag設回1

(6) HookSSDT  (mainly hooking function!)

PULONG HookSSDT(PUCHAR syscall, PUCHAR hookaddr){

    /* local variables */
    UINT32 index;
    PLONG ssdt;
    PLONG target;
    PULONG ret;

    /* disable WP bit in CR0 to enable writing to SSDT */
    DisableWP();
    //DbgPrint(" The WP flag in CR0 has been disabled.\n");
    DbgPrint(" In HookSSDT().\n");
    /* identify the address of SSDT table */
    ssdt = KeServiceDescriptorTable.ServiceTable;
    DbgPrint(" The system call address is %x\n", syscall);
    DbgPrint(" The hook function address is %x\n", hookaddr);
    DbgPrint(" The address of the SSDT is %x\n", ssdt);
    /* identify 'syscall' index into the SSDT table */
    /* *()means to dereference, to get the content at that addr */
    index = *((PULONG)(syscall + 0x1));
    DbgPrint(" The index into the SSDT table is %d\n", index);
    /* get the address of the service routine in SSDT */
    target = (PLONG)&(ssdt[index]);
    DbgPrint(" The address of the SSDT routine to be hooked is %x\n", target);
    DbgPrint(" The content of ssdt[261] is %x\n", ssdt[index]);
    //ret = (PUCHAR)InterlockedExchange(target, hookaddr);
    ret = (PVOID)InterlockedExchange(&ssdt[index], hookaddr);
    DbgPrint(" exchange!new ssdt[261] is %x\n", ssdt[index]);
    /* hook the service routine in SSDT */
    return ret;
}


HookSSDT的參數是syscall 以及 hookaddr,syscall是要hook的api address,但此api不是native code。前面有提到,這種API一開始就會將index 放入eax中在call KiServiceTable到SSDT中呼叫真正的native api。(ntokrnl.exe中: Zw系列-->call Nt系列)。

簡單來說這裡的sample中我給的參數是ZwQuerySystemInformation的addr,沿著此address找到index value之後我再去SSDT[index]得到我想要的NtQuerySystemInformation,就可以hook NtQuerySystemInformation啦!

HookSSDT做的事情有:
(1)Disable WPflag
(2)利用KeServiceDescriptorTable.ServiceTable取出ssdt的起始address
(3)利用syscall addr+1取出syscall的index(用*取出該address的內容)
(4)取得SSDT[index]的address (用&取得)
(5)用InterlockedExchange()交換兩address的內容
(6)return InterlockedExchange的return value,也就是回傳ntQuerySystemInformation的address

(7) Hook_ZwQuerySystemInformation

/* hook function */
NTSTATUS Hook_ZwQuerySystemInformation(ULONG SystemInformationClass,
PVOID SystemInformation, ULONG SystemInformationLength, PULONG ReturnLength){

    /* local variables */
    NTSTATUS status;
    PBYTE buffer;
    /* calling new instructions */
    DbgPrint(" ZwQuerySystemInformation hook called\n");

    /* calling old function */
   status=oldZwQuerySystemInformation(SystemInformationClass,SystemInformation, SystemInformationLength, ReturnLength);
    // if(!NT_SUCCESS(status))
    if (status == STATUS_INFO_LENGTH_MISMATCH) {
        DbgPrint("Error:length mismatch! Allocate new buffer! ");
        //PBYTE buffer = malloc((PULONG)ReturnLength * sizeof(PBYTE));
        PBYTE buffer = ExAllocatePoolWithTag(PagedPool, ReturnLength, 'Tag1');
        if (buffer == NULL){
        DbgPrint(" Allocate Error\n");
        status = STATUS_INSUFFICIENT_RESOURCES;
        return status;
        }
    status = oldZwQuerySystemInformation(SystemInformationClass, (PVOID)buffer, ReturnLength, NULL);
        if (status == STATUS_SUCCESS){
            DbgPrint("--call origin api again and success! \n");
        }
    }else if (NT_SUCCESS(status)){
    DbgPrint("call origin api success! \n");
    }
    return status;
}

HookSystemInformation會call old native api ,也就是ntQuerySystemInformation,來繼續retrieve system information。

(8) DriverUnload


Driver 的unload有分2部分,分別是DriverUnload Routine以及 Driver image實際上的unload,我參考了reference3畫了一個簡易圖示如下


程式碼部分這裡沒有做太多事,只有將SSDT有修改的地方restore回去,也就是將原本ntQuerySystemInformation的address放回SSDT[261]裡去。最後call IODeleteSymbolicLink以及 IODeleteDevice準備unload driver image。

VOID DriverUnload(PDRIVER_OBJECT DriverObject)
{
    UNICODE_STRING usDosDeviceName;
    /* restore the hook */
    /* let syscall addr in SSDT point to original syscall addr*/
    if (oldZwQuerySystemInformation != NULL){
   oldZwQuerySystemInformation=(ZwQuerySystemInformationPrototype)HookSSDT((PULONG)ZwQuerySystemInformation, (PULONG)oldZwQuerySystemInformation);
        EnableWP();
        DbgPrint(" The original SSDT function restored\n");
    }

    DbgPrint("Driver unload\n");
    RtlInitUnicodeString(&usDosDeviceName, L"\\DosDevices\\MySSDTHooking");
    IoDeleteSymbolicLink(&usDosDeviceName);
    IoDeleteDevice(DriverObject->DeviceObject);
}

(9) DriverEntry (Driver程式進入點)

DriverEntry中做的事情有
(1)IOCreateDevice:create device object
(2)若create 成功,assign major function給driver object。這裡全都assign同一個function,也就是 MyDriver_UnSupportedFunction,這個function什麼也不做,只是一個簡單的雛形。
(3)assign DriverUnload function,這個動作有點像是callback function,就是告訴system當driver 要 unload時該call哪一個function。
(4)IoCreateSymbolicLink:create symbolic link
(5)call HookSSDT,最重要的step。第一個param是ZwQuerySystemInformation,因為他是我們的目標嘛,第二個param是Hook_ZwQuerySystemInformation,就是我們要replace ZwQuerySystemInformation的function。Call HookSSDT之後,SSDT的第261個entry內容就會指向Hook_ZwQuerySystemInformation,並且return 原來ZwQuerySystemInformation的address。我將他存在oldZwQuerySystemInformation(一個global variable),之後在driver unload以及Hook_ZwQuerySystemInformation裡都會用到此變數,因為我需要call 這個真正的native api以維持system 正常運作。

NTSTATUS DriverEntry(PDRIVER_OBJECT pDriverObject, PUNICODE_STRING pRegistryPath){

    NTSTATUS NtStatus = STATUS_SUCCESS;
    unsigned int uiIndex = 0;
    PDEVICE_OBJECT pDeviceObject = NULL;
    UNICODE_STRING usDriverName, usDosDeviceName;

    DbgPrint("DriverEntry called\n");

    // initialize driver name and device name
    RtlInitUnicodeString(&usDriverName, L"\\Device\\MySSDTHooking");
    RtlInitUnicodeString(&usDosDeviceName, L"\\DosDevices\\MySSDTHooking");
    // create a new device object(type is FILE_DEVICE_UNKNOWN, can only be used by a application)
    NtStatus = IoCreateDevice(pDriverObject, 0, &usDriverName, FILE_DEVICE_UNKNOWN, FILE_DEVICE_SECURE_OPEN, FALSE, &pDeviceObject);

    if (NtStatus == STATUS_SUCCESS){
        /* MajorFunction: is a list of function pointers for entry points into the driver */
        for (uiIndex = 0; uiIndex < IRP_MJ_MAXIMUM_FUNCTION; uiIndex++)
           pDriverObject->MajorFunction[uiIndex] = MyDriver_UnSupportedFunction;

        pDriverObject->DriverUnload = DriverUnload;
        pDeviceObject->Flags |= DO_BUFFERED_IO;
        pDeviceObject->Flags &= (~DO_DEVICE_INITIALIZING);

        // Create symbol link
        IoCreateSymbolicLink(&usDosDeviceName, &usDriverName);
        DbgPrint("ZwQuerySystemInformation is at %x\n", ZwQuerySystemInformation);
        oldZwQuerySystemInformation =     (ZwQuerySystemInformationPrototype)HookSSDT((PULONG)ZwQuerySystemInformation, (PULONG)Hook_ZwQuerySystemInformation);
        DbgPrint("HookSSDT return addr is %x\n", oldZwQuerySystemInformation);
    }
    DbgPrint("DriverEntry finished\n");
    return STATUS_SUCCESS;
}

(10) MyDriver_UnSupportedFunction

前面提過啦~這在這裡是一個不重要的function,以後有用到再紀錄

NTSTATUS MyDriver_UnSupportedFunction(PDEVICE_OBJECT DeviceObject, PIRP Irp){
    NTSTATUS NtStatus = STATUS_NOT_SUPPORTED;
    //DbgPrint("MyDriver_UnSupportedFunction called\n");
    return NtStatus;
}

(11) Summary


總結一下這一次的project是hook ZwQuerySystemInformation,但實際上是更改SSDT[261]指向的位置,原本指向NtQuerySystemInformation,我改成指向自己的hook_function,ZwQuerySystemInformation負責將index存入eax再call system service,所以真正回報系統info的是NtQuerySystemInformation。

(12) Reference

以上的程式大部分不是我自己會寫的,而是讀了許多文章學習而來,仍有許多問題還未解決,以後再陸續紀錄新問題與解決之法。
[1] 完整hooking教學
http://resources.infosecinstitute.com/hooking-system-service-dispatch-table-ssdt/
[2]中文教學 
http://www.cnblogs.com/BoyXiao/archive/2011/09/03/2164574.html
[3] Unload driver concept
http://blogs.msdn.com/b/usbcoreblog/archive/2009/10/06/why-doesn-t-my-driver-unload.aspx
[4] alloc text msdn
http://msdn.microsoft.com/en-us/library/sw8ty6zf.aspx
[5]Building and deploying a basic WDF Kernel Mode Driver
http://www.codeproject.com/Articles/13090/Building-and-deploying-a-basic-WDF-Kernel-Mode-Dri
[6]DbgMessage filter
http://msdn.microsoft.com/en-us/library/windows/hardware/ff551519(v=vs.85).aspx

終於寫完了然後code怎麼這麼醜阿~天啊 Q_Q
by BlackCat 


2014年6月30日 星期一

Windows Driver 3_ Provision Computer For Driver Deployment And Testing

In the previous discussion, I used [manually configure debuggers and do not provision], but in this way, the driver files must be installed by myself. In order to save time, I use [Provision computer and choose debugger settings], the more details is in 
http://msdn.microsoft.com/en-us/library/windows/hardware/hh698272(v=vs.85).aspx

I'll show steps briefly...
Assume that the driver has built already and the things we have to do is to  deploy and test it.

1. Go to C:\Program Files\Windows Kits\8.1\Remote\x86, then copy [WDK Test Target Setup x86-x86_en-us] into your target computer and install it. 


2. In Host Computer (Visual Studio 2013)

   [Driver] menu -> test-> Configure Computer

   choose second one, and notice that the computer name must as same as the name of your target computer,


you can find your target computer's name just like second pictures:


After clicking next, you have to set the pipe name. 


Note that the pipe name must as same as the pipename you set in vmware. The picture below shows the pipe name that I set at VMware before.
(We create this serial port to let virtual computer know that there's a port it can use. This serial port is a virtual port and VMware will receive the data from virtual computer through this port, then send the data out to the host computer according to the pipe name, the host computer must have the same pipe name to receive these data from VMware and handle them, and that's why we set a pipe name in Visual Studio and in VMware both the same.)


After finishing the configuration, system will connect to your target computer, and if success, it will show "complete" at last.

3. Now go back to the Visual Studio and in the Solution Manager Window(方案總管), right click [HelloWorld Package]-> properties -> Driver Install -> Deployment
Click [Enable deployment] and [Remove previous driver versions before deployment]
Then, entering Target Computer Name
Finally, in the [Hardware ID Driver Update], Type "Root\HelloWorld". Hardware ID does not identify a real hardware, it identifies an virtual device, and we must give it a place in the devie tree as child of the root node. The doc in Microsoft mentioned that we do not need to select [Hardware ID Driver Update] if it's a real hardware. Instead, we should choose [Install and Verify]


4. When you click F5 in your visual studio trying to remote debug to the target computer, this program will control the target computer, create a WDKRemoteUser account and move the driver packages, even run the driver automatically.


From now on, you don't need to copy your driver packages into the target computer manually, the debugger in Visual Studio will do it for U. Hurray!!!!!!


2014年6月29日 星期日

Windows Driver 2 _ HelloWorld Driver

It's time to write my first driver "HelloWorld"
I write this code in VS2013 and here's my steps

A. Create a new project
    (1) [File] menu->[New]->[Project], in the left pane, select [Installed]->[WDF], in the middle pane, select [Kernel Mode Driver, Empty(KMDF)]. Fill in "HelloWorld" in the name field and choose the project's location in the location field. Check out Create directory for solution. Finally click OK ! 
(Note that the name field can only be equal or less than 32 characters string, mentioned in Microsoft Official Doc)


    (2) In the Solution Explorer(方案總管), right click [HelloWorld]->add->new Item(新增項目). In the middle pane, select C++ File, and name "main.c" in the name field, then click add. Finally, you will see main.c under the Source Files
(Note that the file name extension is .c !!)


Here's the code:
-------------------------------------------------------------------------------------------------------
#include <ntddk.h>  

VOID DriverUnload(PDRIVER_OBJECT driver)
{
DbgPrint("first:HelloWorld End!");
}

NTSTATUS DriverEntry(PDRIVER_OBJECT pDriverObject, PUNICODE_STRING pUnicodeString)
{
DbgPrint("first:HelloWorld Begin!");
pDriverObject->DriverUnload = DriverUnload;
return STATUS_SUCCESS;
}
-------------------------------------------------------------------------------------------------------

     (3) Right click Solution'HelloWorld'(2 Solutions)(方案'HelloWorld')-> configuration manager(組態管理員). Choose configuration and platform both HelloWorld and HelloWorld Package


     (4) Cancel Wpp Tracing
Solution Explorer->right click HelloWorld -> Properties -> set Run Wpp tracing to No -> OK


      (5) also in Properties->C/C++ -> middle pane 警告視為錯誤->否

    (6) Build project
Choose Build Solution->Build to build driver and create a driver package, the ouput window will show the build progress.


      (7) Navigate in Windows Explorer to your HelloWorld folder(..\Visual Studio 2013\Projects\HelloWorld), then go into win7Debug\HelloWorld Package folder, there will have several files:
HelloWorld.sys : the kernel mode driver file
HelloWorld.inf : an information file that Windows uses when driver is installed
HelloWorld.cat : a catalog file that the installer uses to verify the test signature for the driver package
WdfCoinstaller01011.dll : A co-installer for the Windows Driver Frameworks(WDF)


B. After building your project, it's time to test it on target computer.
Before testing your driver, you must copy your [HelloWorld Package]folder into your target computer.
Normally, you will have 4 files in your HelloWorld folder that I mentioned in last article.

     (1) Let's start from setting the DebugView 
          Run -> regedit -> open key :[HKEY_LOCAL_MACHINE\SYSTEM\CurrentControlSet\Control\Session Manager] -> create a key [Debug Print Filter] under this folder -> add a DEFAULT DWORD value and set a value 0x0f on it -> reboot

     (2) open DebugView and check out [capture]->[capture kernel]

     (3) open osrloader and select the sys file you want to load. Then click [Register Service] and [Start Service] then you will see "first:HelloWorld Begin" in DebugView.
Click [Stop Service] then you will see "first:HelloWorld End". If you want to remove the driver, click [Unregister Service].


     P.s You don't need to install the osrloader to load the driver, just find out your inf file, and right click on it, click [install]. However, it's up to you to use osrloader or not.
Another way to load your driver is using command, just entering sc create HelloWorld binPath= "your_sys_file's_location" type= "kernel" start= "demand" error= "normal" Displayname= "HelloWorld", press Enter
then entering sc start HelloWorld


     If you use remote debug, you will see your string at Debugger Immediate Window in VS2013 

[Reference]
1. http://home.educities.edu.tw/fushiyun2000/driver_nt_style_c_tutorial_hello_world.htm
2. http://eagle-sw.blogspot.tw/2011/10/win7debugview.html
3. http://blogs.microsoft.co.il/sasha/2011/06/04/baby-steps-in-windows-device-driver-development-part-2-hello-world-driver/
4. http://blog.csdn.net/wsye88/article/details/26375459

Windows Driver 1_Setting Environment to Remote Debug

In this article, I will discuss how to set up the environment on Host/Target Computer to remote debug the driver running on target computer.
(p.s Target Computer is a virtual computer to test your driver )

A. Environment
Host Computer : Windows7 SP1 x86
                         WDK (Windows Driver Kit)8.1
                         Visual Studio 2013
Target Computer : Windows7 SP1 x86 (Run on VMware Player)
                             Debug View
                             osrLoader

B. Settings on VS2013
      (1) [ Driver] menu-> Test->Computer Configuration
      (2) select [Add New Computer] button -> choose [Manually configure debuggers and do not provision], remember to give it a name!


      (3)  choose [Kernel Mode] and set the values as the picture shows->next->finish


      (4) finally you will get the settings as follow


C. Settings on VM
     (1) open [Virtual Machine Settings]
     (2) delete the Printer in order to let new serial port=1
     (3) [add] -> serial port -> choose [output to named pipe] as its serial port type -> in the Named pipe field enter "\\.\pipe\com_1" and choose [this end is the server],[the other end is an application ] -> finish
Your settings may look the same as follow, and remember to check out the [Yield CPU on poll]


D.  After those settings, turn on the target computer on VM (i.e your target computer=windows7)
     (1) use system manager's identity to open the command line and enter "bcdedit" to open the Windows Boot Manager (以系統管理員身分執行)


     (2) enter a command bcdedit  /copy  {current}  /d  "Windows 7 Kernel Debug Mode"
This command will copy current boot settings and give it a new name, i.e Windows 7 Kernel Debug Mode, and you will see 2 booting selections in boot manager.


       (3) press WIN+R and open "msconfig" service -> choose [boot] (開機) menu, you'll see Windows 7 Kenel Debug Mode in it. Select to boot it as a default selection.(設定成預設值) Now choose it and click 進階選項-> check out  the debug(偵錯) box, and select debug serial port(com1), finally select transmit rate to 115200 -> OK -> reboot your target computer.


E. Wow!!! Get ready to remote debug
     (1) Go back to VS2013 and click [Debugging Tools for Windows-Kernel Debugger]


     (2) select I know what I'm doing, continue debugging
   (3) then you can see your debugging progress in Debugger Immediate Window, if it keeps waiting to reconnect for too long, trying to  reboot your vm again and the connection will be success.


Hurray!!!!!  You can remote debug your driver on target computer right now!

[Reference]
1. http://blog.csdn.net/iceamber2012/article/details/18809813
2. http://blog.csdn.net/iceamber2012/article/details/17963649


2014年1月9日 星期四

Write your own system call

Linux Version 2.6.35.4
(CentOS)
目錄前的Linux代表kernel source code的根目錄
我的Linux= /usr/src/kernels/linux-2.6.35.4

A.      加一個自己的system call
1.      新增一筆syscall service routine name syscall table
Linux/arch/x86/kernel/syscall_table_32.S 中加 “.long sys_process_switch_info”

syscall call發生時kernel會到此table中找到對應的service routine name


2.      定義syscall number
Linux/arch/x86/include/asm/unistd_32.h
把新的number加上去,並將__NR_syscalls +1
(__NR_syscalls代表maximumsyscalls number)


3.      定義syscallprototype
Linux/include/syscalls.h 這裡定義所有的syscall prototype

(asmlinkage是一種語法,用來與不同compiler間溝通)


 4.      Syscall 真正的code
syscall中我自己定義的一個structure (在這裡不重要)
真正的syscallSYSCALL_DEFINE[0-6](….)開始
SYSCALL_DEFINE可以接受06個參數, 第一個參數是SYSCALL NAME不算在內。定義形式是這樣的:
SYSCALL_DEFINE[參數個數](SYSCALL NAME, 參數1型態, 參數1, 參數2型態,參數2….)
因為我的syscall只有一個型態為 process_switch_info*的參數 psi, 因此我是
SYSCALL_DEFINE1(……)
(若沒有參數的話在第3步裡面參數地方要寫void不然會有錯)


5.      加入Makefile(object檔放入 source code tree)
Linux/kernel/Makefile

(新增的syscall放在哪一層,就加在該層的Makefile)


6.   重編kernel
make
make modules_install
make install

B.      測試system call
1.      syscall(__NR_process_switch_info, psi)是呼叫syscall的方法
第一個參數為syscall name, 後面的參數放該syscall所需的參數
可以直接寫在.c中,這裡定義了get_process_switch_info().c中的function name有意義,因此傳了一個自訂的structure進來才呼叫syscall


2014年1月5日 星期日

Ftrace 追蹤kernel process

為了確認process到底是怎麼context switch以及context switch幾次,花了些時間研究了Ftrace。有些地方仍不是很了解,要再查資料研究
Linux version : 2.6.35.4 (CentOS)

1.     Ftrace 是內建的tracker,在編譯核心時可以到選單裡的<kernel hacking>選擇 (因為不太熟悉各選項的用途,因次我全選了= _=)

2.   選完後開始編譯
make à make modules_install à make install àreboot

3.     /sys/kernel/debug , debugfs mount上去
# mount –t debugfs nodev /sys/kernel/debug 

4.     現在可以到 /sys/kernel/debug/tracing, 會看到一大堆檔案
可以查看 available_tracers 看看有那些tracer可以用


5.     使用 tracer的步驟
(a)  關閉 tracing_enabled (0closed, 1 opened)
# echo 0 > tracing_enabled
(b) 打開 ftraced_enabled (不太清楚原因
# echo 1 > /proc/sys/kernel/ftrace_enabled
(c)  選擇目前要用的tracer
# echo … > current_tracer
(d) 設定要跟蹤的函數到 set_ftrace_filter
# echo … > set_ftrace_filter
(e)  打開 tracing enabled
# echo 1 > tracing_enabled
(f)   執行想要追蹤的程式或做其他事, ftrace會開始追蹤kernel
(g)  結束追蹤
# echo 0 > tracing_enabled
或暫停追蹤(tracer只是暫停沒有結束
# echo 0 > tracing_on
(h) 看結果囉!
# cat trace
可以搭配 grep指令列出想看的東西
# cat trace | grep test (test是我剛剛執行的執行檔)
或是 >> trace輸出成自己的檔案
# cat trace >> /trace1 (輸出到跟目錄下 檔名為 trace1)

6.     我這一次觀察了2 tracer
(a)  Function
會列出function執行的順序
下圖是我執行 test 之後的tracer, 我有用 filter鎖定我要看的函數, 也就是主要做context_switchschedule
欄位意思大概是這樣
TASK-PID
Cpu#
TIMESTAMP
FUNCTION
<test>-5049
000
13211.469334
Scheduleßwork_resched
Process test pid 5049正在執行, 使用編號 0CPU, 時間是timestamp, 正由work_resched呼叫schedule function
看樣子應該是準備進行contest switch


我的test就是會讓他睡8次的一支程式(作業需要XD)
所以可以看到8nanosleep呼叫schedule準備把控制權交出來然後去睡覺

(a)  Sched_switch
列出 context switchinfo
下圖是使用sched_switchprocess context switchc的情況
我用 grep test 過濾出我想看的, 欄位意思大概是

TASK-PID
Cpu#
TIMESTAMP
FUNCTION
<test>-5182
000
14456.847013
(*)
(*): 5182:120:S == > [000] 0:120:R <idle>
   pid 5182, priority 120,目前狀態S代表 TASK_INTERRUPTIBLE可中斷睡眠狀態
== >代表轉移控制權( + 可能是代表正在叫醒某Process)


7.     Reference

全國推廣動物認領養平台串聯貼紙

全國推廣動物認領養平台串聯貼紙